

Now that it’s in full fruit I play whack-a-mole with the mulberry tree almost daily. I love having mulberry jam in the pantry and making mulberry buckles and cobblers. But this year I decided to try something different. I made mulberry fruit leather (just like the fruit roll up treats you probably ate as a kid) for my grandchildren.
Unfortunately I decided to make the fruit leather when I should have been resting in bed so it didn’t turn out as well as I’d hoped in the looks department. By the time it was dried enough it was after 10 o’clock at night and, given my physical condition so far this week that was about 3 hours past when I should have been asleep. But they taste great! To give them a little extra flavor I added a little cardamom. My grand kids have pretty sophisticated tastes so I think they’ll really appreciate the flavor boost.
I washed 8 cups of mulberries and put them in a large saucepan. I cooked the fruit uncovered, over low heat for 10 minutes then added sugar, lemon juice, and the cardamom. After stirring in the additional ingredients I covered the pan and cooked the mulberries for another 10 minutes.

After letting the mixture cool a bit I poured it into my blender and tasted it. If you use a blender please, please be aware of the safety precautions needed. Hot liquids and blenders can be explosive! Hold a folded towel on the lid of the blender and apply some pressure. If you don’t, you will probably end up with hot fruit all over the kitchen and your skin!

I adjusted the sugar, lemon juice, and cardamom, adding a bit more of each ingredient. Then I pureed the mixture thoroughly. You can also use a potato masher or immersion blender to puree the fruit.
After getting the flavor I wanted I allowed the puree to cool for about 10 minutes (honestly, I probably should have let it cool longer). While the puree was cooling I prepared my dehydrator trays by putting parchment paper on two trays. I do have the sheets that the manufacturer of my dehydrator makes for things like fruit leather but someone put them away for me and I can’t find them.
Once the trays were ready I poured the puree on the parchment paper and spread it around. It should be about 1/4 inch thick except for the edges which should be a little thicker. Mine wasn’t quite thick enough. I’m terrible at judging depth and should have used the ruler I use for canning.
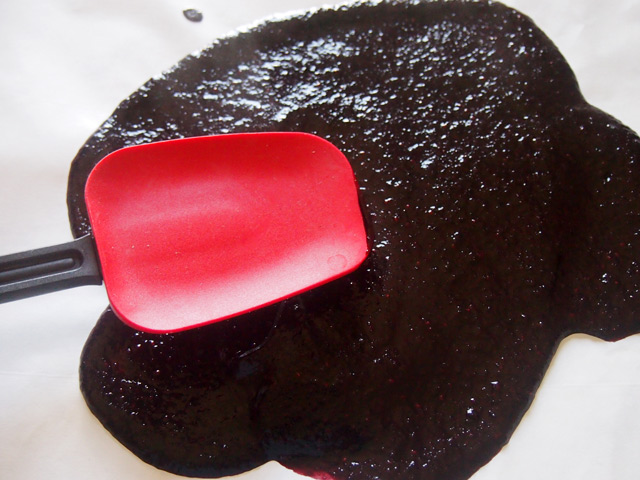
You can see the puree is still quite hot as there’s a little steam visible on the left side.
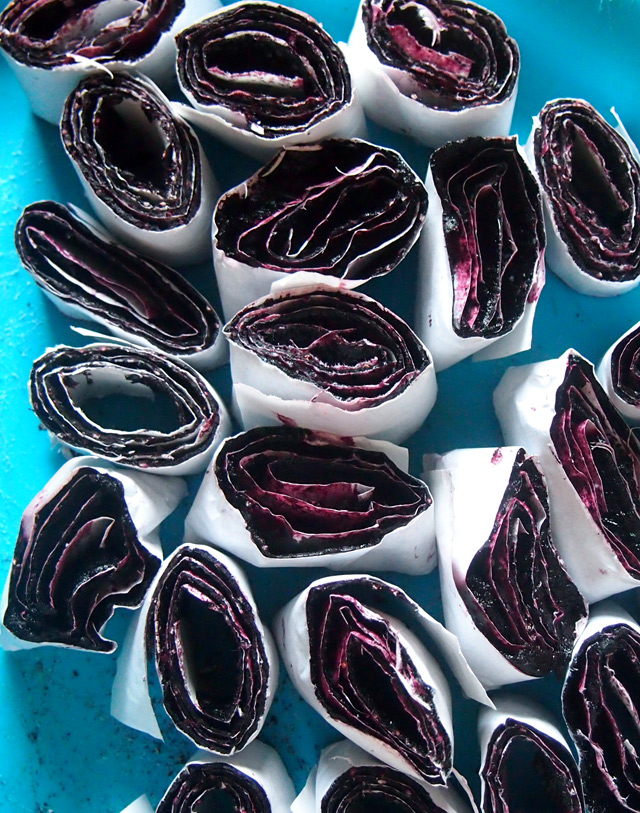
Then it was simply a matter of sliding the trays in and turning the dehydrator on at 135°F. I set the timer for 12 hours but it only took about 6. I turned the trays 1/4 turn each hour. When the leather was done I rolled it in the parchment paper to keep it from sticking to itself. I used a rubber band to hold it rolled up.

This morning I used scissors to cut the fruit leather into approximately 1 inch wide sections. My hands were giving me hell so some are bigger and some are smaller. I really just wanted to get them cut so I wasn’t as precise as you may be.
And that’s it! I now have Mulberry Fruit Leather. I’ll probably store it in the freezer since we won’t eat a lot of it all at once.
Mulberry Fruit Leather
Ingredients:
- 8 cups mulberries washed and drained well
- 2 tablespoons sugar (or honey) or to taste
- 2 teaspoons lemon juice
- 1/2 teaspoon cardamom (optional)
Directions:
- Cook the mulberries in a large saucepan, uncovered, for about 10 minutes over low heat.
- Add the sugar, lemon juice, and cardamom (if using) and stir to combine.
- Cover the pan and continue cooking the berries for about another 10 minutes.
- Puree the berries in a blender or use an immersion blender or potato masher.
- Taste and adjust sugar, lemon juice, and cardamom to taste.
- Allow puree to cool for about 20 minutes then pour on prepared dehydrator trays. If using the oven spread parchment paper on a baking sheet with a rim and pour the puree on that.
- Dry in dehydrator set at 135°F (or the manufacturer’s recommended temperature for fruit leathers) for 6 – 12 hours, rotating the trays 1/4 turn every hour. If making leather in the oven, set the temperature to the lowest possible setting and turn the trays every hour.
- Once the leather is dry but still pliable, roll the parchment paper so that the leather doesn’t stick to itself and allow leather to cool.
- Cut the rolled leather into approximately 1 inch wide strips.

